1.
Introduction
This
guide will take you through the procedure you will need to follow in
order to set up a basic Penetration (“Pen”) Testing Environment
using commonly used tools and platforms.
2.
Download the required installation files
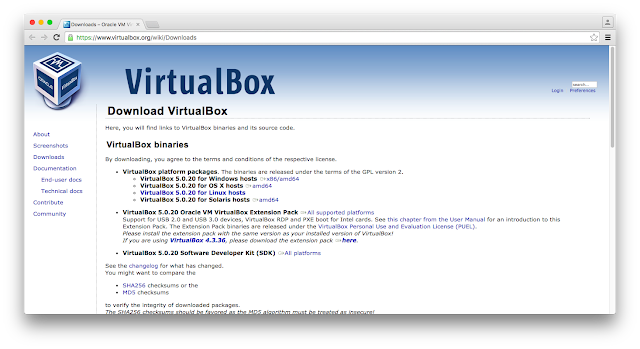
Download
the “VirtualBox
5.0.20” installation disk image file for your platform from
https://www.virtualbox.org/wiki/Downloads
(note that this will already include the latest VirtualBox Guest
Additions installer image)
Download
the “VirtualBox 5.0.20 Oracle VM VirtualBox Extension Pack”
installation file from https://www.virtualbox.org/wiki/Downloads
Screenshot
1
Download
the “Kali Linux 64 bit” installation ISO file from
https://www.kali.org/downloads/
Screenshot
2

Download
and extract the “Metasploitable 2 Linux” virtual machine
installation zip file from
https://sourceforge.net/projects/metasploitable/files/Metasploitable2/
Screenshot
3

3.
Install VirtualBox and the Extension Pack
Browse
to where you downloaded the “VirtualBox 5.0.20” installation disk
image file and run it. You should see a screen similar to the one
below. Just click “Continue”.
Screenshot
4

You'll
be presented with a screen similar to the one below. Just click
“Install”.
Screenshot
5

Once
the installation completes your screen should like similar to the one
below. Just click “Close”.
Screenshot
6

Browse
to where you downloaded the “VirtualBox 5.0.20 Oracle VM VirtualBox
Extension Pack” installation file and run it. VirtualBox will open
and you should see a screen similar to the one below. Just click
“Install”.
Screenshot
7

The
installer will require you to scroll through the “VirtualBox
Personal Use and Evaluation License (PUEL)” and click “I Agree”
similar to the screenshot below. Click “I Agree”.
Screenshot
8

The
installer will provide the following notification when installation
is complete. Click “OK”.
Screenshot
9

You
will be presented with the VirtualBox Welcome screen. Congratulations
you have completed the base installation of VirtualBox. There is more
configuration to come.
Screenshot
10

4.
Create the Virtual Host Virtual Machines and Configure Virtual Host
Networking
4.1.
Create Kali Linux Host Virtual Machine and Basically Configure
Open
VirtualBox and Click on the “New” icon at the top left of the
VirtualBox user interface
Screenshot 11

Once you have clicked the
“New” icon at the top left of the VirtualBox user interface, you
should be presented with a screen similar to the following. In this
screen enter “Kali Linux” in the “Name” field, “Linux” in
the “Type” field and “Debian (64-bit)” in the “Version”
field. Once done, click “Continue”.
Screenshot
12

You
should now be presented with the following screen. Enter “1024”
for the memory size, then click “Continue”.
Screenshot
13

You'll
now be asked to create a virtual hard disk via a number of options.
Select the “Create a virtual hard disk now” option then click the
“Create” button.
Screenshot
14

You'll
then be asked to choose the type of file that you would like to use
for the new virtual hard disk. Select “VDI (VirtualBox Disk Image)”
then click “Continue”.
Screenshot
15

The
next screen requests whether you want a dynamically allocated size or
a fixed size per below. Select the “Dynamically allocated” option
then click “Continue”.
Screenshot
16

The
next screen asks where you'd like to store the virtual hard disk and
also its maximum size. The name field should read “Kali Linux”
and the size field should ideally be “20” Gbs. Once done, click
“Create”.
Screenshot
17

You
should now see the following screen detailing the key configuration
information for this virtual machine. Click the “Settings” icon
at the top left of the screen.
Screenshot
18

You
should now see the following settings interface. Click on the
“System” icon appearing at the top menu.
Screenshot
19

Once
you've clicked on the “System” icon, click on the “Processor”
tab, select the “Enable PAE/NX” extended features option.
Screenshot
20

Next
click on the “Display” icon appearing at the top menu, then under
the “Acceleration” options, select “Enable 3D Acceleration”
then click “OK” to save these basic configuration settings (we'll
be doing some final network configuration later).
Screenshot
21

4.2.
Create Metasploitable 2 Linux Host Virtual Machine and Basically
Configure
Open
VirtualBox and Click on the “New” icon at the top left of the
VirtualBox user interface. Once
you have clicked the
“New” icon at the top left of the VirtualBox user interface, you
should be presented with a screen similar to the following. In this
screen enter “Metasploitable 2 Linux” in the “Name” field,
“Linux” in the “Type” field and “Ubuntu (32-bit)” in the
“Version” field. Once done, click “Continue”.
Screenshot
22

You
should now be presented with the following screen. Enter “512”
for the memory size, then click “Continue”.
Screenshot
23

You'll
now be asked to create a virtual hard disk via a number of options.
Select the “Use an existing virtual hard disk file” option and
navigate to where you extracted the “Metasploitable 2 Linux”
virtual machine installation zip file, and locate and select the
“Metasploitable.vmdk” file. Once done, click the “Create”
button.
Screenshot
24

Once
you click “Create” you should now be taken back to the main
screen and see both your virtual machines setup and ready to host the
Kali Linux and Metasploitable 2 Linux Operating Systems that we'll
install soon. First of all we need to complete some basic networking
configuration.
4.3.
Basic Networking Configuration
Open
the “VirtualBox” menu and click on “Preferences”.
Screenshot
25

Within
the “Preferences” interface select the “Network” top level
menu item, click on host only networks, then click on the “Add new
host only network” icon to the right.
Screenshot
26

Once
you add the new host only network, a new “vboxnet0” network is
created that requires some further configuration.
Screenshot
27

Select
the vboxnet0 network then click on the “Edit selected host only
network” icon to the right to display the following dialog.
Screenshot
28

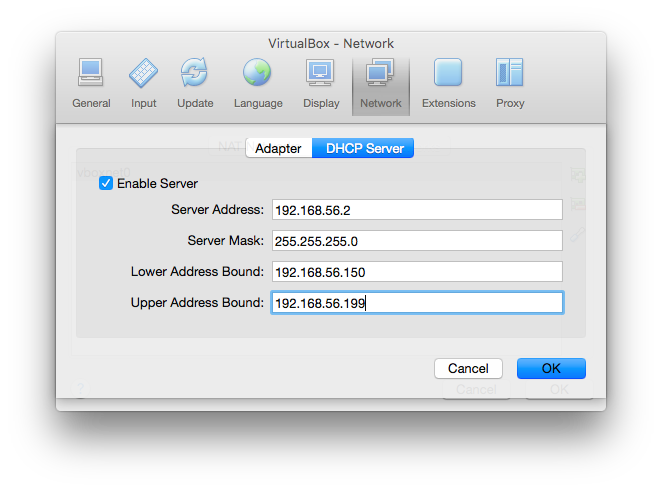
Click
on the “DHCP Server” tab and fill in the details as shown in the
screenshot below. Once done, click “OK”.
Screenshot
29
Click
“OK” again to go back to the main screen.
Screenshot
30

Now
we need to configure the Virtual machines. We'll configure the Kali
Linux “Attacker” machine with two network adapters (one for acces
to the internet, the other for access to the “Target”
network/machine).
We'll
start with the Kali Linux virtual machine. Select the Kali Linux
machine in the main window and click the “Settings” icon.
Screenshot
31

Once
you've clicked the “Settings”, click on the “Network” menu
item across the top, then click on the “Adapter 1” tab. In this
tab select the “Enable Network Adapter” option and in the
“Attached to:” select “Bridged Adapter”. Also select “Name:”
as your host machine's network adapter. Finally, click on the
“Advanced” roll-up and ensure that “Cable Connected” is
checked.
Screenshot
32

Click
on the “Adapter 2” tab and select the “Enable Network Adapter”
option and in the “Attached to:” select “Host-only Adapter”.
Also select “Name:” as the “vboxnet0” adapter you setup
earlier. Finally, click on the “Advanced” roll-up and ensure that
“Cable Connected” is checked.
Screenshot
33

We'll
finish with the Metasploitable 2 Linux virtual machine. Select the
Metasploitable 2 Linux machine in the main window and click the
“Settings” icon. Once you've clicked the “Settings”, click on
the “Network” menu item across the top, then click on the
“Adapter 1” tab. In this tab select the “Enable Network
Adapter” option and in the “Attached to:” select “Host-only
Adapter”. Also select “Name:” as the “vboxnet0” adapter you
setup earlier. Finally, click on the “Advanced” roll-up and
ensure that “Cable Connected” is checked.
Screenshot
34

Congratulations,
you have successfully completed the VirtualBox setup. Now on to
installing the Linux operating systems on the virtual machines.
5.
Install Kali Linux and Complete Network Configuration
Click
on the Kali Linux virtual machine and then click on the “[Optical
Drive]” link under “Storage” at the “IDE Secondary Master:”
and when the menu appears select the “Choose disk image ...”
option and when the file chooser appears open the “Kali Linux 64
bit” installation ISO file you downloaded earlier. Once done, click
on the “Start” icon at the top of the screen to start the Kali
Linux virtual machine with the loaded “Kali Linux 64 bit”
installation disk image.
Screenshot
35 & 36


The
following screen will load within the Kali Linux virtual machine.
When the “Boot menu” appears select the “Graphical install”
option using the cursor keys and hitting Enter.
Screenshot
37

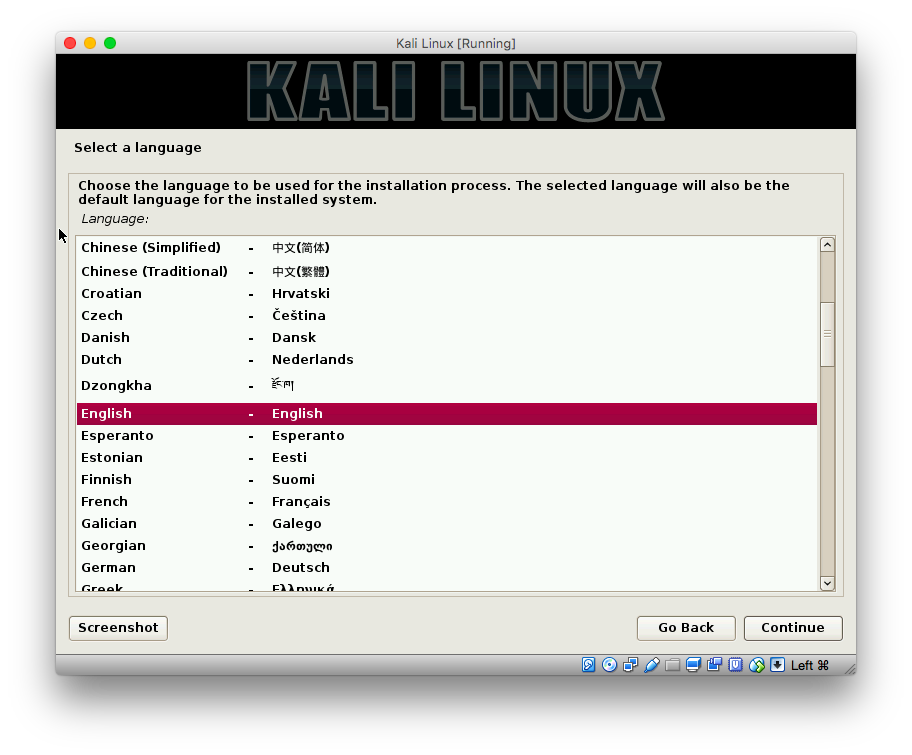
In
the following screen, select your language (I've used English) then
click Continue.
Screenshot
38
In
the following screen, select your location (I've used United Kingdom)
then click Continue.
Screenshot
39

In
the following screen, select your keyboard language (I've used
British English) then click Continue.
Screenshot
40

The
installer will now load.
Screenshot
41

In
the following screen, select your network interface then click
Continue.
Screenshot
42

In
the following screen, enter the host name as “kali” then click
Continue.
Screenshot
43

In
the following screen, enter the domain name as “vbnet” then click
Continue.
Screenshot
44

In
the following screen, create the root password then click Continue.
Screenshot
45

In
the following screen, select the “Guided – use entire disk”
partitioning option then click Continue.
Screenshot
46

In
the following screen, select the vbox hard disk then click Continue.
Screenshot
47

In
the following screen, select the “All files in one partition” for
the partitioning scheme then click Continue.
Screenshot
48

In
the following screen, select “Finish partitioning and write changes
to disk” then click Continue.
Screenshot
49

A
confirmation defaulting to “No” will display as follows that
you'll need to change to “Yes” in order to progress with the
install. Then click “Continue”.
Screenshot
50

The
installation will start as follows.
Screenshot
51

Once
the installer has finished copying the files to the virtual hard
disk, the “Configure the package manger” screen will display.
Select “Yes” in response to “use a network mirror?” then
click Continue.
Screenshot
52

In
this next screen, leave the proxy information blank and click
Continue.
Screenshot
53

The
package manager will now be setup.
Screenshot
54

Once
this is done, the GRUB boot loader installation options will appear.
Select “Yes” to installing the GRUB boot loader to the master
boot record then click Continue.
Screenshot
55

The
GRUB bootloader installation will then ask what disk to install GRUB
to. Selct the disk containing the text “VBOX_HARDDISK” then click
continue.
Screenshot
56

The
installation will then finish as follows.
Screenshot
57

Once
the installation is complete the system will show the following
screen. Click Continue to finish the remaining install and restart.
Screenshot
58

Once
the restart is complete you should see the login screen. Enter “root”
in the Username field and hit Enter.
Screenshot
59

Enter
the root password you set earlier into the Password field and hit
Enter (or click “Sign In”).
Screenshot
60

You
should now be logged in and able to se your Kali Linux desktop. There
is some more configuration to go yet.

For
the next part of the setup we're going to use the Terminal. Open the
Kali Linux Terminal and run the following commands:
- apt-get update
- apt-get dist-upgrade -y
- apt-get install dkms linux-source linux-headers-$(uname -r)
Restart
the virtual machine and login. Once at the desktop select the
VirtualBox “Devices” menu and then the “Insert Guest Additions
CD Image...” item.
Screenshot
61

The
CD will autoload and if so, then Cancel the autoloader.
Screenshot
62

Return
to the Kali Linux terminal to run the following commands (as root):
- cd /media/cdrom
- cp VBoxLinuxAdditions.run /root/
- chmod 775 /root/VBoxLinuxAdditions.run /root/
- cd ~
- ./VboxLinuxAdditions.run
Once
the VboxLinuxAddtiona.run file has completed its execution, restart
the virtual machine. We'll now complete the Kali Linux setup by
assigning the DHCP server to the vboxnet0 facing Kali Linux host
interface. Run the following command in the Terminal to open the
network interface configuration file:
- #vi /etc/network/interfaces
Then
insert the following lines and write and quit (“i” to insert; esc
then :wq to write changes to disk and quit vi):
#
The host-only network interface
auto
eth1
iface
eth1 inet dhcp
Restart
networking by running he following command:
- service networking restart
Restart
the virtual machine. You have now successfully and fully installed
your Kali Linux host. Now to see if we can connect the Kali host to
the Metasploitable 2 Linux Host (prebuilt through use of the
previously downloaded VMDK image file).
6.
Checking Connectivity between the two Virtual Hosts
Open
the Terminal on the Metasploitable Linux host (by the way the
username is msfadmin and the password is msfadmin) and type:
- ifconfig -a
You
should be able to see a 192.168.56.XXX address (mine is
192.168.56.150). This is the address we are going to ping from the
Kali Linux host.
Open
the Terminal on the Kali Linux host and ping the Metasploitable 2
Linux host IP address using:
- ping 192.168.56.150 -c 10
If
the ping command pings and comes back with 10 packets received then
we're in business. Congratulations you have now completed the Setting
Up a Basic Pen Testing Environment Guide. You will now be able to use
this as an initial testing ground to practice and try out your
penetration testing skills.
No comments:
Post a Comment